

(AKA, The SARGE User Guide)
1. Installation
There is no real installation procedure. SARGE is a stand alone binary, so all you have to do is download it, unzip it, and then run it. On Windows the SARGE.exe binary is located inside the sarge_win folder. On the Mac you’ll just run the SARGE.app produced from the ZIP file. Another option is to visit www.sargegames.com and use the web-player link on the SARGE page, or run it now.
2. Modes of Operation
SARGE has three basic modes of operation: Single-Player Game, Multi-Player Game, and Simulation mode. These labels might be a bit confusing at first, but this section will resolve that. If you’re looking to simulate a robot and control it using your own architecture via a TCP/IP connection, you’ll want to choose Simulation Mode. For detailed instructions on the network protocol, see the old SARGE User Guide, which written back when SARGE only supported network-based control. You will also want to take a look at the SARGEController helper class for Java to make your life easier (it has all the necessary comms functions built in). Even if you’re not using Java, take a look, you can translate it to your language of choice.
If you want to practice driving a robot using a keyboard or joystick you’ll want to take a look at the Game Mode. I’ve tried to organize the Game Mode in a way that looks similar to commercial games. You can pick Single or Multi-Player games, Multi-Player gives you the option to host a game or join an existing game.
2.a. Single-Player Game
The single-player mode allows a single operator to drive a robot in one of the available environments. To get started simply do the following:
1. Start SARGE and click through the splash screen.
2. Press the Game Mode button.
3. Press the Single Player button.
4. Select the environment you want to use by using the << and >> buttons. Then either click on the image or hit the Load Arena button at the bottom of the screen.
5. Wait a second or two, the level will load and you will be presented with a robot selection menu. Use the << and >> buttons to select the robot you want to use, then click on the robot image to choose that robot.
6. If the environment has multiple spawn points, you will be presented with a menu to select a spawn point. Use the Previous and Next buttons to cycle through the spawn points. The camera is pointing in the direction the robot will be spawned. Hit the Choose This Spawn Point button to spawn the robot.
At this point you should be looking through the camera of your robot. Continue to Section 3 for details on robot control.
2.b. Multi-Player Game
The multi-player mode is only slightly more complicated than the single player mode. In multi-player mode you can connect many players over a LAN or the Internet to have a joint training session (or robot smashing event). SARGE has been tested with about 25 players connected to one host. The host is the machine which runs the SARGE server, all other players connect to this computer. SARGE is currently capped at 99 remote players. If you have a very fast host machine and gigabit LAN you can probably accommodate all 100 players (99 remote + 1 host). To get started simply do the following:
1. Start SARGE and click through the splash screen.
2. Press the Game Mode button.
3. Press the Multi Player button.
4. Decide if you are going to be the host or a client. If you are going to host the game, choose Host Game. If someone else is hosting the game, choose Join Game.
5. If you are joining an existing game, skip to step 12. If you are hosting go to step 6.
6. Congratulations, you’ve decided to host a game. You now need to select the maximum number of players your game will allow (including yourself). Use the + and - buttons to adjust this number.
7. The Game ID is the game name that will show up in the game list your clients will see when they select Join Game. Enter a name that they will recognize.
8. The Comment field is another field that they will see, so feel free to write whatever comments you deem necessary in this field.
9. If you want to password protect your game so that random people do not join it (the game list is public) enter it here. Your clients will need to know this password to join the game. Note that the password feature is relatively untested, so if you have a problem, please let me know and I will fix it ASAP.
10. Now that you have all the necessary host information entered, press Next.
11. Select the environment you want to use by using the << and >> buttons. Then either click on the image or hit the Load Arena button at the bottom of the screen. Now skip to step 13.
12. Congratulations, you are letting someone else pick the environment and are deferring all control to them, just sit back, relax, and enjoy the ride. Just kidding (mostly). You should see a list of available games. All you have to do is find the game you want to join and press Join. Your computer should talk to the host and set things up for you.
12a. If your host decided to password protect the game, you should see a Password dialog. Enter the password they gave you and hit Next.
13. Wait a second or two, the level will load and you will be presented with a robot selection menu. Use the << and >> buttons to select the robot you want to use, then click on the robot image to choose that robot.
14. If the environment has multiple spawn points, you will be presented with a menu to select a spawn point. Use the Previous and Next buttons to cycle through the spawn points. The camera is pointing in the direction the robot will be spawned. Hit the Choose This Spawn Point button to spawn the robot.
15. Well, there’s not really a step 15, you should be in the game now. If you’re not in the game, see Section 5 for troubleshooting help. If you’ve done all this before, you’re good to go; otherwise see Section 3 for details on robot control.
3. Robot Control
The robots in SARGE generally have the same controls, however each have unique features that require extra controls. Find your robot of choice in this section and find out what makes it special. Read part on All Robots for the basics. In the future I will have an Input manager which allows you to customize the control, but for now you’re stuck with what is listed here.
All Robots
You can drive the robots forwards, backwards, left, and right using arrow keys. You can also use a USB joystick for this. The joystick must be plugged in before you start SARGE. I’m pretty sure any single axis joystick will work fine. Additionally a dual axis control pad similar to the XBox and PS2/3 controllers should also work for basic control. For the more advanced functions, I’d like your feedback as the buttons and axes are numbered differently and will require some work on my part to get them working. (This is why I’m going to do an input manager some time unless Unity Tech. gets a scriptable input manager together).
Packbot
The Packbot has flippers that can rotate a full 360 degrees. You can use this to right the vehicle if you’ve flipped it or to climb stairs and other obstacles. You can rotate the flippers up and down with the E and D keys.
Inuktun VGTV Extreme
The Inuktun Extreme VGTV is a polymorphic robot. It can change it’s shape from relatively flat to more of a triangle to better position the camera and navigate obstacles. Unfortunately, this is ridiculously hard to simulate correctly and so hasn’t been implemented just yet. However this VGTV also has a movable camera and the Survivor Buddy device attached as a payload which would prevent the use of the shape shifting anyway.
To rotate the camera up and down use the U and J keys. The VGTV also has variable intensity headlights, to increase the intensity use the + key, to decrease the intensity use the - key.
You can control the Survivor Buddy using the onscreen GUI in the lower right hand corner of the screen.
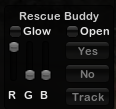
First (or at any time really) set the RGB color of the Glow light. SARGE will remember this setting through multiple sessions. If you hit the Glow toggle and wonder why there is no glow, make sure the RGB sliders are not at the bottom. To disable the glow, press the Glow toggle again. To open the Survivor Buddy hit the Open toggle. Once the Survivor Buddy is open you can choose to play the Yes animation, which causes the device to nod yes once or you can play the No animation which causes the device to nod no once. You can also have the device track an object (victim or other) by clicking on the Track button, then clicking an object in the environment. You can see which object will be selected in the status area at the bottom of the screen. To stop tracking an object, click UnTrack. To close the Survivor Buddy, hit the Open toggle again.
UCF Bot
The UCF Bot is small and slow. The only controls available are Forward, Backward, Left and Right. Use the arrow keys or a joystick.
Victim (Red Shirt Dude)
The Victim model must be spawned at an appropriate spawn point. At this time they are not labeled, in fact, there is only 1 and it is in the Testbed environment. If you find yourself looking through the world from an odd point of view, you’ve picked the wrong spawn point. At this time the Victim can only look around the environment, it is assumed that they are incapacitated in some way that prevents them from moving.
Observer (The Invisible Man)
The Observer is able to move anywhere in the game, including through walls. The observer is controlled using the arrow keys and the Shift+Mouse movement. The arrow keys will move the camera forward, backward, left and right along the axes of current camera rotation. To rotate the camera press Shift and move the mouse. This allows you to set the observer position and not worry about accidentally changing the view.
4. Troubleshooting
So, I guess something didn’t work if you’re reading this. Are you trying to host a multiplayer game that no one can find? Did SARGE crash? Does something not work how you expect? Well, let me know. Go to the Contact Page at www.sargegames.com and send me a note detailing the issue.
Network Issues
If no one can find your hosted game, watch for the popup message when you first start SARGE, this is the output from a network connection test. If mentions a public IP or all your clients are on the same LAN, you can give them your IP and they can enter it in the Unlisted IP section of the Join Game window.